Showing posts with label art. Show all posts

Saturday, December 21, 2013

Giveaway Time! Etsy Watercolor Print

Guys. You guys.

I totally scored the jackpot for you today.

Our Etsy sponsor for this year's blog party is an absolutely stunning artist: http://www.etsy.com/shop/ArtbyJessBuhman She paints animals in watercolor, and let me tell you, I envy whoever wins this beauty.


One lucky winner will receive an 18" x 24" print of that darling. Open to US only - again, sorry, my international readers, but shipping outside the US gets kinda steep.

I'd say more about Jess and her art, but really, it speaks for itself. A photo is worth a thousand words. I'd say her paintings are worth five thousand each, at least. I'm not kidding. Whoever wins this, I will be jealous. I have never wanted to win my own giveaways this badly!

Thursday, October 31, 2013

Blog Tour: Becoming the Chateran {Mini-Excerpt + Illustration}

From Chapter Twenty-Seven:

Rhea wanted to take off her gown, heavy with filigree and fur, and go to bed. A headache was threatening at her temples, and her eyes were sore and hot after her tears. After another pause, Ohnferead sighed, relaxed his arms from over his chest, and gave himself a little shake. Then he turned to Rhea. For a moment, the two stood gazing at each other. Then he stepped up to her and took her hands in his once more. He started to say something, stopped, then tried again.

“I hope the people shall pardon you. Empyrean be with you, RheĂșlea.” He bent quickly and kissed her forehead, then turned and marched out of the room.


Don't forget to check out yesterday's post for an interview with Stacia, author and illustrator of Becoming the Chateran, plus a look at the cover!

Monday, September 23, 2013

Blog Tour: Goddess Tithe {Cover Reveal + Giveaway!}

Goddess Tithe by Anne Elizabeth Stengl
A Novella of Goldstone Wood

The Vengeful Goddess Demands Her Tithe

When a stowaway is discovered aboard the merchant ship Kulap Kanya, Munny, a cabin boy on his first voyage, knows what must be done. All stowaways are sacrificed to Risafeth, the evil goddess of the sea. Such is her right, and the Kulap Kanya's only hope to return safely home.

Yet, to the horror of his crew, Captain Sunan vows to protect the stowaway, a foreigner in clown's garb. A curse falls upon the ship and all who sail with her, for Risafeth will stop at nothing to claim her tithe.


Will Munny find the courage to trust his captain and to protect the strange clown who has become his friend?

From the author:

I had the fun of designing this cover—finding reference photos, inventing the composition, applying the text, etc.—but the actual artistic work was done by talented cover artist Phatpuppy (www.phatpuppyart.com), whose work I have admired for many years. It was such a thrill for me to contact and commission this artist to create a look for Goddess Tithe that is reminiscent of the original novels but has a style and drama all its own.

The boy on the front was quite a find. I hunted high and low for an image of a boy the right age, the right look, with the right expression on his face. Phatpuppy and I worked with a different model through most of the cover development stage. But then I happened upon this image, and both she and I were delighted with his blend of youth, stubbornness, and strength of character! It wasn’t difficult to switch the original boy for this young man. He simply is Munny, and this cover is a perfect window into the world of my story.


You can’t see it here, but the wrap-around back cover for the print copy contains some of the prettiest work . . . including quite a scary sea monster! Possibly my favorite detail is the inclusion of the ghostly white flowers framing the outer edge. These are an important symbol in the story itself, and when Phatpuppy sent me the first mock-up cover with these included, I nearly jumped out of my skin with excitement!


There are eight full-page illustrations in Goddess Tithe featuring various characters and events from the story. This is the first one in the book. I decided to share it with all of you since it depicts my young hero, Munny the cabin boy, under the watchful eye of his mentor, the old sailor Tu Pich. Munny is on his first voyage, and he is determined to learn all there is to know about a life at sea as quickly as possible. Thus we see him utterly intent upon the knot he is learning to tie. Tu Pich is old enough to know that no sailor will ever learn all there is to know about the sea. Thus he looks on, grave, caring, and perhaps a little sad. He might be looking upon his own younger self of many years ago, fumbling through the hundreds of difficult knots his fingers must learn to tie with unconscious ease.

I enjoyed creating all the illustrations for Goddess Tithe, but this one was my favorite. I love the contrasts of light and dark, the contrasts of young and old . . . youthful intensity versus the perspective of age.


Giveaway! US and Canada only, please :)

a Rafflecopter giveaway

Thursday, August 22, 2013

Rules of Drawing for Complete Noobs (A.k.a. Beginners)

I am a writer.  Stick around here any amount of time, and you'll probably notice that.

I am not a draw-er.  (What's the proper word for someone who draws, anyway?)  There are many writers out there who can draw beautifully, and use this skill to put their stories on paper visually.  I have never been one of those people.  I have always envied those people.


This year, despite my better judgement, I've decided to attempt to become one of those people.  I chose a drawing book (Line Upon Line: An Incremental Approach to Drawing) for my senior year art class.  If all goes well, I'll at least know drawing terms and how to tell pencils apart at Hobby Lobby, even if my lack of talent is still torturing my poor new sketchpad.

To get started, I decided something: I would draw a picture before I ever looked at my art book, and mark it as my first drawing of the year.  That way, I could compare it to the drawings I make during/after this class, and hopefully see improvement.  Since my main reason for wanting to draw is to draw characters, it seemed natural for this first "compare drawing" to be of characters.  Of course I would choose Rykel and myself as the test subjects...


I guess you could say Rykel looks okay... better than I expected, anyway.  (That shows you just what I mean when I refer to my lack of talent.)  I'm not sure whom I resemble more: Flat Stanley or the Wicked Witch of the West.  I think I'm leaning more towards Witch, with that nose and those ears and you-call-those-things-freckles?! *shudder*  (I'm a spotted elf, for all I can tell.)  Not to mention I really have no idea what happened to that shirt.  Those were supposed to be ruffles, I promise, not blades or fins or who knows what else.  Clearly I know nothing about human biology, either.

I could go on all day about that horrifying thing I call a drawing, but I have other things to share with you.  See, I decided to ask my writer/draw-er friends at Go Teen Writers what advice they might impart on a brand-new attempting draw-er.  I present to you the results:

Rules of Drawing for Complete Noobs
(aka beginners)

1. Practice makes perfect.  At least, closer to perfect than before.

2. Don't compare your work to others'.

3. Practice.

4. Tracing is a great exercise and helpful for beginners.

5. Practice.

6. Anyone can draw, and draw well, if they practice enough.  Anyone.

7. Practice.

8. Don't give up.

9. Practice.

10. Don't set your standards too high.  Learning a new skill takes time.

11. Practice.

12. Don't press too hard with the pencil - light strokes.

13. Practice.

14. Copying is good for learning to get shapes, perspectives, and shading right - especially copying black and white images.

14. Practice 24/7, on every available surface, until your arm aches and your eyes are watering.

15.  Don't rely on copying and tracing, though.  They're great tools, but the goal is to learn to draw so you can draw what you see and what you imagine - not just what others have already put to paper.

16. Practice some more.

17. Basically, just draw and you will learn how to draw.  Keep practicing.

Saturday, April 13, 2013

DIY Party Diva: Rapunzel Slumber Party {Decor}


Rapunzel Slumber Party
{Decor}
Theme: Disney's Tangled; Guest list: Girls, ages 2-8

Paper Lanterns


What you'll need: Scrapbook paper, scissors, glue or double-sided tape, craft wire, pen or pencil

What to do: For two mini lanterns, cut the scrapbook paper in half.  For a tall lantern like the middle one in the top photo, use a whole square sheet.  Fold the long edges in a little, like hemming in sewing, and glue or tape in place.
Fold the paper width wise, not quite in half.  You want enough extra sticking out to tape or glue later.  Fold the extra over the end of the paper and crease both folds.


Now unfold the paper and fold both ends - the end of the paper and the crease marking off your tape extra - to the middle fold and crease again.  Unfold.  Match the crease for the extra with the edge of the paper and tape or glue in place.

You should now have a freestanding lantern.  All you have to do now is carefully poke a hole in two opposite sides of the lantern using the pen or pencil.  Make sure not to get too close to the edge and keep the length from the edge the same on both sides.  Keep the hole small - just big enough for the end of your craft wire to slide through.  Now cut a length of craft wire, slide one end through one hole, and tie or twist it to keep it from pulling back out.  Repeat with the other end and other hole.

Voila!  Your own royal birthday lantern!

Rapunzel's Braid


What you'll need: A skein of pale yellow yarn (about 650 feet, actually); purple ribbon; at least two assistants (I had four)

What to do: Have an assistant hold the skein of yarn while you measure out an 18-foot piece.  Yes, 18-foot; that's 6 yardsticks.  Cut and repeat twelve times; set aside these pieces.  Make two more 12-piece clusters, same length.


Now, use a scrap bit of yarn to tie the clusters together with a six-inch or so tail.  Have an assistant hold that end while you and the rest of your assistants braid the three clusters.  The original tutorial said one person held the end while two others braided.  I found it helped immensely to have one person per cluster (three people braiding) while another person held the end and Mom watched the actual braiding.  There were a few times when the strands got twisted or a 'bump' (if you've ever braided real hair, you know what I mean!).  Mom would point that out so we could fix it without having to undo a lot of braiding.


Once you have about six inches left, tie off the braid with another scrap of yarn.  Tie a pretty purple ribbon bow over the scrap on each end.  All done!

Tune in next week for party activities!

Saturday, March 30, 2013

The Pinterest Report: Headband Upcycle


Week Sixteen: Headband Upcycle

Apologies, my dear readers, but I can't seem to find the place I first saw this project.  So we'll skip The Pin and The Link and go straight to The Test, because this project is so fun and easy I have to share it anyway!


The Test:

What you'll need: a headband, ribbon, hot glue gun and sticks, decoration (extra ribbon, fake gems, fake flowers, small feathers, etc. - optional)


What to do: Make sure you have enough ribbon for the whole headband before starting this project!  Now, hot glue the end of the ribbon to the underside of one end of the headband.  Squeeze a line of glue along the underside of the headband and carefully wrap the ribbon around and press it into the glue.  Make sure not to overlap the ribbon too much, but don't leave gaps either.  And don't burn yourself!  Take it from me: no fun.


Continue gluing small lines and wrapping until the whole headband is covered, then cut any leftover ribbon and glue the end to the underside of the headband end.  All done!  I didn't do this part, but if you want, you can add feathers, gems, bows, flowers, or whatever tickles your fancy. :)


I love my new-old headband!  The old white headband I used was dingy and yellowed and just bleck.  But now this matches a couple of my favorite shirts and brightens my hair up easily!

The Grade:


Thursday, March 14, 2013

How to Make a Disney Princess Movie


Ten simple steps to your next favorite family film!

1. Pick a fairy tale.  You may immediately think of those centered around princesses and/or love stories, but considering the Arabian Nights tale that Aladdin was based on, it's not actually necessary for a princess or love story to be the key point.  All you really need is either (a) a girl who is or can be made into a main character, or (b) such a boy who does not have a significant other in the story.  Some that I've found: The Princess and the Pea, Brother and Sister (love that one!), The Twelve Dancing Princesses, The Canary Prince, Maid Maleen (I've read an amazing adaptation of this one), The Silent Princess (really cool one), The Thirteenth Son of the King of Erin, Thumbelina, The Young Gardener, Catherine and Her Destiny, The Six Swans (another favorite of mine).


2. Choose your setting.  Maybe your tale is set in a specific time period and/or place, like The Princess and the Frog.  Maybe it's just a vague story involving forests and castles and royalty, like Tangled.  Maybe it's in-between - showing elements of a certain culture but not too detailed or specific, like Beauty and the Beast (a French tale).  Whatever the case, choose now when and where your story will take place and how specific you'll get when it comes to food, clothing, furniture, hairstyles, cultural norms, architecture, etc.  Do a little bit of research now, to get an idea of the culture you've chosen and to help with outlines and character sketches.

3. Sketch an outline.  First make an outline - nothing elaborate, just numbered steps of the story - of the fairy tale you chose.  Then change characters or plot points and tweak anything less than unbelievable or non-kid-friendly.  Just make sure the story involves love and some way for the girl to become a princess by the end if she's not one (i.e, marrying a prince, discovering long-lost family, etc.)  If the story you chose has no main girl, either add one or make a girl already in the tale center stage.  Don't be afraid of changes; the fairy tale is just a starting point!  After all, the original The Little Mermaid ends with the prince marrying someone else, so the mermaid dies and becomes a spirit of the air.  Not to mention that the princess the prince ends up with, on whom Disney based the seductive-princess version of Ursula, was in the original tale already engaged to the prince before the mermaid met him.

4. Create your princess.  (Who, of course, may or may not be an actual princess when your story opens.)  Give her a name, a few key traits (not necessarily all good), at least a basic life story and family background, and a visual description.  Example: Snow White is a hazel-eyed, kind, animal-loving but naive orphan princess who longs for love.  She strives to treat the people the way she longs to be treated, thus winning over everyone she meets except her only relative, her stepmother.  She lives in the castle with her stepmother the queen, who envies Snow's raven black hair, milky white skin, and blood red lips.

5. Create your villain.  Pretty much the same steps for the princess, plus a main motive to hate/work against the princess, her family, and/or her man.  Example: The Evil Queen is a pale-skinned, green-eyed young widowed queen never seen without her crown who longs for the admiration of others.  She grows to hate her prettier, more famous stepdaughter - who was always loved more by the late king and the people than the queen was - and turns to dark magic to rid herself of Snow and fill the voids in her life with the admiration of her beauty sure to follow Snow's demise.

6. Create your hero.  A prince, a hobo, a thief, an explorer, the son of a baker or merchant - whatever you want.  Again with the name, traits, back story, and description.  Example: Prince Ferdinand is a brunette royal from a far country who met Snow White once before her stepmother turned on her and she vanished.  Longing to be with the girl whose simple desire for love in her life matched his own, he sets out in hopes of finding her alive and willing to return to his country as his future queen.

7. Fill in the side characters.  Now give description, names, and some details to the lesser characters - the villain's ailing mother, the princess's bratty sisters, the hero's best friend.  You know, all the people you included in the main characters' back stories or who play a part in the story.  Example:  The dwarves are seven brothers who are each named after their foremost trait: Doc, Bashful, Sleepy, Happy, Dopey, Grumpy, and Sneezy.  They live the bachelor life together in a cottage in the woods, passing the time by mining for gems in a abandoned nearby mine.

8. Do your research.  Now's the time to look more in-depth at all that stuff we discussed in step two.  At this point, you'll have to look at your story outline and characters to know what will be important to know.  After all, the cultural expectations within Pocahontas's Indian tribe weren't necessarily the same as other Indian tribes of the time period.  (Although Pocahontas is generally a bad, bad, bad example of research.  Disney really screwed up their history with that one.)

9. Write your script.  Everything we've done has led up to this point.  (This is also the step where you should name your movie.)  Now we're really getting to work!  Here are two articles to help you out: How to Write an Animation Script and Write a Script for an Animated Cartoon.  For some true Disney inspiration, check out the full, final-draft Toy Story script - or is The Lion King more your style?

10. Animate!  First make your storyboard (sketch breakdowns of each scene to give a visual idea of how each scene should look, play out, etc.).  Then to the drawing board!  I'm not really a drawing type of artist, so I don't have much advice to give you, but maybe do some online research and/or find an artsy friend(s) to help you out.

Saturday, February 16, 2013

The Pinterest Report: Toilet Paper Tube Pillow Boxes


Week Thirteen: Toilet Paper Tube Pillow Boxes
{all photos linked to source}

Note: Thursday's post was probably not worded as well as it could have been.  I intended it to sound like "We should love people all year, not just Valentine's Day."  Instead I feel like it came across more as "I hate Valentine's Day, such a dumb idea!"  Please know this was not what I meant!

The Pin:

do it yourself toilet paper tube pillow boxes

The Link:


The Test:

What you'll need: pretty/scrapbook paper, scissors, tape, ribbon, at least one toilet paper tube, small gifts (I used candy)

What to do: Really, this is one of the easiest Pinterest projects I've done.  Measure and cut a rectangle of scrapbook paper to go around the middle of the TP tube.  Tape it down and cut a piece of ribbon to go around the middle of that.  You can make a ribbon bow with it if you'd like.  Tape it down.

Now pinch and then push in the ends of the tube.  You'll have to go with the photo on this one, since it's hard to explain.  Fill the tube and close the other end the same way.  Tape down the ends if you need to.

Tada!  Finished.  Sorry, but I only have finished-project photos today, since once again I forgot to take pictures while working.


The Grade:

Fun, easy, fast, versatile, only needs a few supplies - I love this one!


Saturday, February 9, 2013

The Pinterest Report: Handmade Photo Key Chains (Part Two)


Week Twelve: Handmade Photo Key Chains, Part Two
{all photos linked to source}
{See part one here.}

This was a particularly long project, which in turn means this is a particularly long post with a lot of photos.  It might slow down your computer or take a while to load.

The Pin:


mod podge photo key chains
The Link:


You'll need: mod podge, paintbrush, decorating stuff (scrapbooking paper, stickers, die cuts, contact-size photos, colored pens, paint, etc.)

What to do: Obviously, this part is way open to your own choices and creativity.  However, I'm sharing how I make my key chains.  Feel free to copy my process!


Step One: Cut a small rectangle of scrapbooking paper, slightly bigger than your key chain base piece.  Mod podge one side of the key chain to the back of the paper.  Trim and let dry.  (I worked on six key chains at a time, so that by the time I'd finished each step with the sixth, the first piece was dry enough for the next step. Also, I forgot to take a photo of this step.  See the third and fourth pieces in the photo above.)

Step Two: Decorate the key chains with... well, whatever you want!  For one I printed off a photo of Adam, a boy I babysit, and added a sticker and some glitter dots I cut off some glitter scrapbooking paper.  Another key chain I made has a photo off the internet of daffodils, with some decorative paper that I wrote "Dream of Daffodils" on.  My third just has a "Dream" 3D scrapbooking sticker.


Step Three: Paint the backs of the key chains and let dry.  This make take several coats, depending on how dark the color is, and if you're perfectionist like me you may want to use a tiny brush to carefully paint the textured white edges of the key chain card.  I like the paint idea, because that way it's clearly the back and it's simple and plain, but it's not the ugly back of a gift card.  You could easily use colored or scrapbooking paper, or even make the key chain double sided.


Step Four: Once the paint is completely dry, mod podge the front of the key chains.  Let dry and repeat on the back.  This prevents the key chains from getting scratched or having add-ons on the front peel off.


Step Five: Put the key chain on something - a key ring, string, ribbon, one of those small ball chains, a pipe cleaner, even a necklace string or chain.  It doesn't have to be a key chain!

 Ta-da!  All done!

The Grade:

I really enjoyed this project, especially the fact that it took more time and allowed for a lot more freedom and creativity than most Pinterest crafts I've tried.  I'll definitely be repeating this one!  It even works for gifts; I gave the key chain with Adam's photo to his mom and she loved it!


Saturday, February 2, 2013

The Pinterest Report: Handmade Photo Key Chains (Part One)


Week Eleven: Handmade Photo Key Chains, Part One
{all photos linked to source}

This was a particularly long project, which in turn means this is a particularly long post with a lot of photos.  It might slow down your computer or take a while to load.

The Pin:


mod podge photo key chains
The Link:


My Crazy Life as a Farmer's Wife: Instructions for my key chains!

The Test:

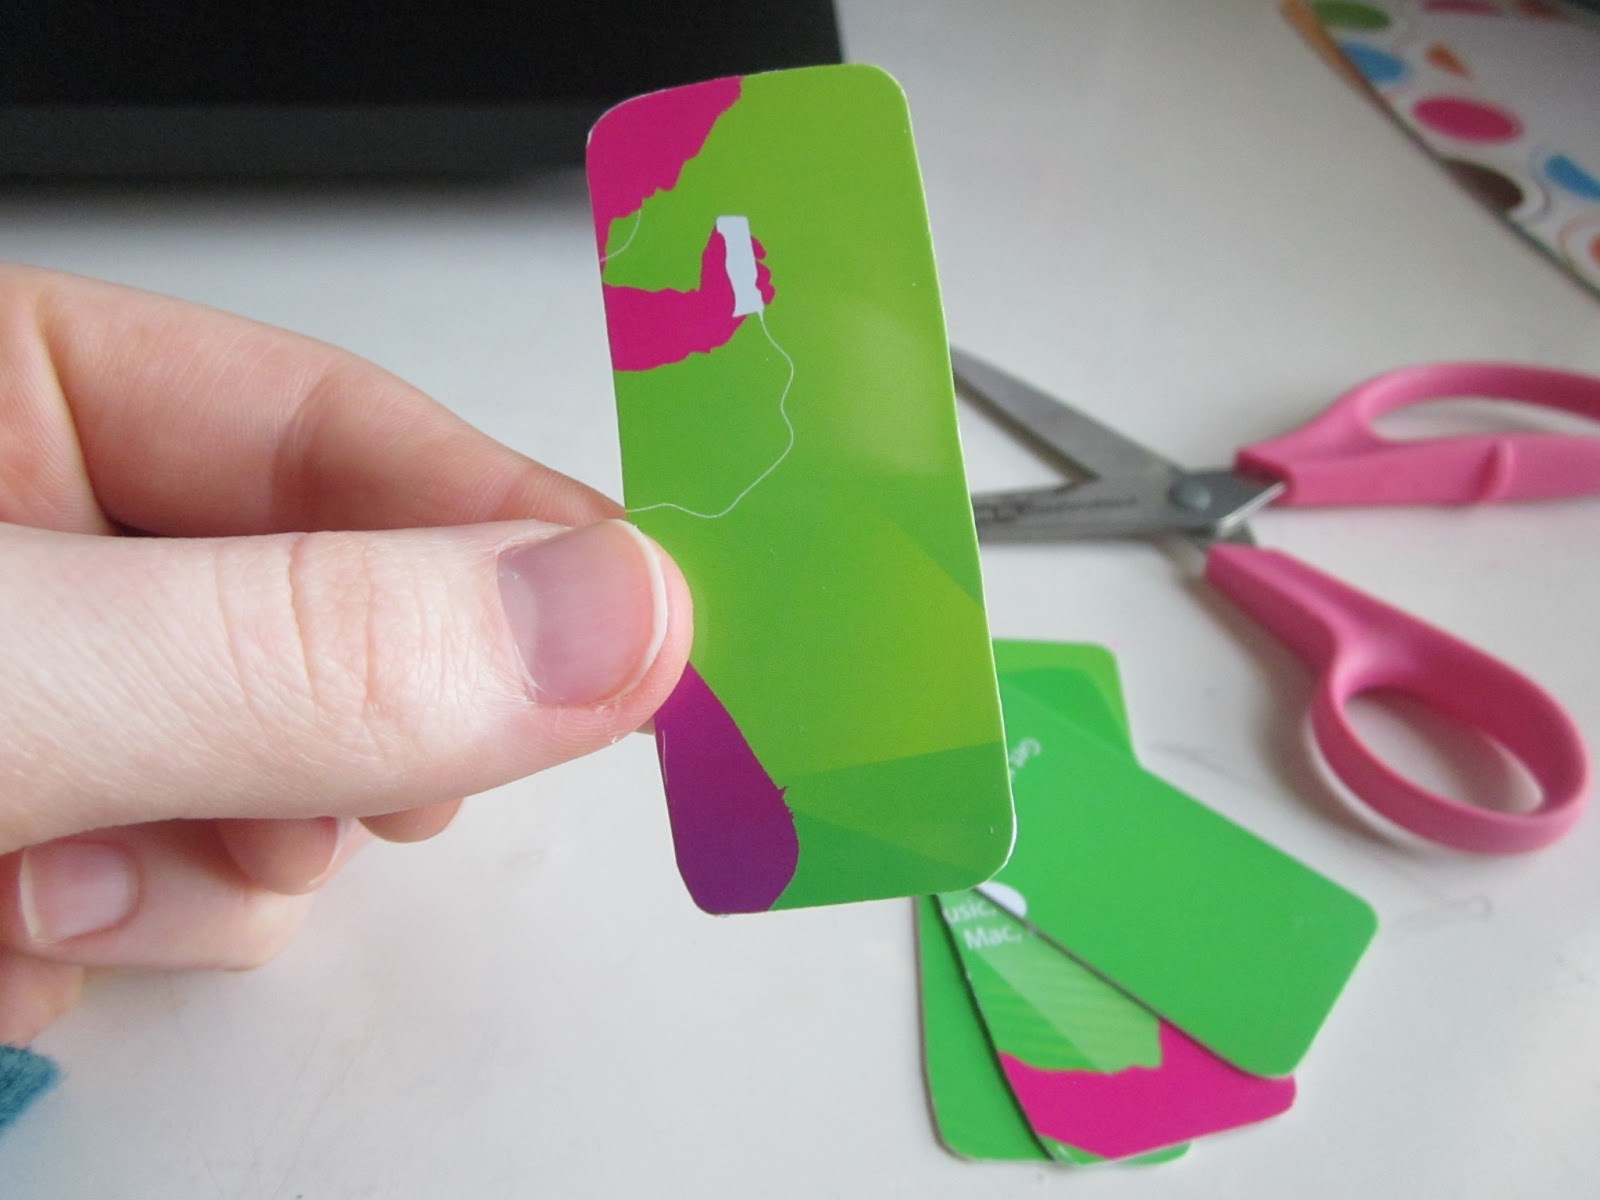
(As part one, this is technically a test of the pin only.  See, the link uses pre-made key chains purchased online.  However, this was a test on the idea with the pin, which was to make the key chains using old cards.)

You'll need: At least one old gift/credit/debit card, scissors, ink pen (optional)


What to do: First, cut the gift, credit, and/or debit cards into rectangles about the size of the key chains you'll want.  I really like how they all turn out a little different.  Make sure to round off the sharp corners, too.


Now we need a hole to hang the key chains on.  I learned later on that my holes, which I was afraid I was making too big, were actually too small.  So be sure to make them a little bigger than mine!

This step is optional, but it really helped me: use the ink pen to put a dot where you'll want the hole.


Now line up the tip of your scissors with that dot.


And, a bit unconventionally, (try to be safe!) twist, turn, push and otherwise scrape your way into that little dot.  Make sure not to crack, break, or shatter the gift card.  Also, twisting the key chain between scissors and work space (like I did) may cause damage to the work space.  This step is also time-consuming.  Consider yourselves warned.


Although it feels like you're making absolutely no headway, eventually you'll get a small hole like this.  That's where it gets a bit easier!  Using your fingers to control and back the key chain, carefully and slowly wedge/twist your scissor tip into the hole until you get a visible bump on the back:


Line up your scissors with this, just like you did with the ink dot on the front, and repeat the dance of the scissors!  Once you finally get a hole through, twist and push your scissors in until it's the size you want.  Again, remember that you'll probably need holes bigger than mine.  Learn from my mistake.


Hang with me!  Just one more step to decorating-ready key chains!  You see all that stuff sticking out around the edges of the hole?  That'll be poking out on both sides.  We have to get rid of that.  Over a trash can preferably, line up the edge of your scissors against that poky gunk and scrape it off.  It'll seem a bit like you're playing with a saw.


Do that on both sides, and voila!  You're done and ready to decorate!


The Grade:

Stay tuned for decorating ideas and the grade in part two next Saturday!