Hello, lovely readers! I know today is a blog-post day on my schedule, but I've actually got something a little different going on. Caitlin Hensley, a writer friend of mine from Go Teen Writers, does author interviews. Today I'm her special guest, talking about my soon-to-be-released ebook Sixteen as well as my writing life in general. Go check it out!
Thursday, May 30, 2013
Tuesday, May 28, 2013
Blog Tour: Captives {Bonus Stuff!}
There were so many fun extras available for this blog tour, I decided to do a separate post to share them all with you! So, my lovely readers, enjoy!
Click on any image to be directed to a related website, page, or Safe Lands article.

Click on any image to be directed to a related website, page, or Safe Lands article.


Monday, May 27, 2013
Blog Tour: Captives {Book Review + Giveaway!}
Captives by Jill Williamson

 Will Mason uncover the truth hidden behind the Safe Lands’ façade before it’s too late?
{Giveaway after the review}
Amazon Page
GoodReads Page
LibraryThing Page
Author Website
Amazon Summary:
My Thoughts:
This book rocks.
Seriously, I loved it. I'm not sure what else to say! The future lifestyle, the beliefs of Safe Lands nationals and of outsiders, the technology, the customs... it was all so believable, so realistic, so awesome. I'm inclined to agree with other reviewers who said it's a little scary. If a plague like the Great Pandemic were to hit in real life, this is a future I could see forming in my lifetime! (Granted, I'd be as old as the grandfather Papa Eli by the time it reached the point where this book opens.) I honestly couldn't put Captives down.
The characters were great. I understood and connect with Omar, even though he's the one who betrayed his village. I had trouble clicking with Levi and Mason, but once I did I came to respect Levi. Mason is my absolute favorite character. I love him, his thought process, his personality - man, he was great. As for the supporting characters, I couldn't stand Father, but you're not really supposed to like him. Papa Eli was a wonderful grandfather and leader. Shaylinn, a young teenage girl from Mason's village, was sooo sweet and my favorite girl from the village. Ciddah, a Safe Lands national, was amazing. I can't wait to see more of her. The rebels that Levi connected with were not cliche at all - everyone in the book was their own person. Red and Belbeline (red-headed women who like men and clubs and have... unique style) were a little too similar in my opinion, but most of the time they're still pretty easy to distinguish.
A good dystopian has to have some new technology and culture. ColorCasts, ChatterBoxes, SimArt, PVs - I loved it. Totally believable and really, really cool. As for the culture, I love how the Safe Lands has its own words - femme for girl, glossy as 'cool' or 'in' sort of thing, mimic for fan (as in I'm a fan of Jill Williamson), etc. The television shows, medical information, clubs, and architecture all added to the creative and plausible future world.
This book does have some mature themes, so it's not for kids. However, for Jill's target audience of older teens, it's perfect. Just perfect. I can't find anything wrong with this book and recommend it to everyone 15 and older. Five stars!
I received this book for free from the author in exchange for a review. All opinions expressed are entirely my own.
And now for the giveaway! One lucky winner (US addresses only, sorry) will receive a copy of Captives from Jill's publicist.
a Rafflecopter giveaway
Check in at the other tour stops! Many of them are also running giveaways, so you can increase your chances of winning ;)
 Will Mason uncover the truth hidden behind the Safe Lands’ façade before it’s too late?
{Giveaway after the review}
GoodReads Page
LibraryThing Page
Author Website
Amazon Summary:
One choice could destroy them all.Book Trailer (Best. Book trailer. Ever.):
When eighteen-year-old Levi returned from Denver City with his latest scavenged finds, he never imagined he’d find his village of Glenrock decimated, loved ones killed, and many—including his fiancée, Jem—taken captive. Now alone, Levi is determined to rescue what remains of his people, even if it means entering the Safe Lands, a walled city that seems anything but safe.
Omar knows he betrayed his brother by sending him away, but helping the enforcers was necessary. Living off the land and clinging to an outdated religion holds his village back. The Safe Lands has protected people since the plague decimated the world generations ago … and its rulers have promised power and wealth beyond Omar’s dreams.
Meanwhile, their brother Mason has been granted a position inside the Safe Lands, and may be able to use his captivity to save not only the people of his village, but also possibly find a cure for the virus that threatens everyone within the Safe Lands’ walls. Will Mason uncover the truth hidden behind the Safe Lands’ façade before it’s too late?
My Thoughts:
This book rocks.
Seriously, I loved it. I'm not sure what else to say! The future lifestyle, the beliefs of Safe Lands nationals and of outsiders, the technology, the customs... it was all so believable, so realistic, so awesome. I'm inclined to agree with other reviewers who said it's a little scary. If a plague like the Great Pandemic were to hit in real life, this is a future I could see forming in my lifetime! (Granted, I'd be as old as the grandfather Papa Eli by the time it reached the point where this book opens.) I honestly couldn't put Captives down.
The characters were great. I understood and connect with Omar, even though he's the one who betrayed his village. I had trouble clicking with Levi and Mason, but once I did I came to respect Levi. Mason is my absolute favorite character. I love him, his thought process, his personality - man, he was great. As for the supporting characters, I couldn't stand Father, but you're not really supposed to like him. Papa Eli was a wonderful grandfather and leader. Shaylinn, a young teenage girl from Mason's village, was sooo sweet and my favorite girl from the village. Ciddah, a Safe Lands national, was amazing. I can't wait to see more of her. The rebels that Levi connected with were not cliche at all - everyone in the book was their own person. Red and Belbeline (red-headed women who like men and clubs and have... unique style) were a little too similar in my opinion, but most of the time they're still pretty easy to distinguish.
A good dystopian has to have some new technology and culture. ColorCasts, ChatterBoxes, SimArt, PVs - I loved it. Totally believable and really, really cool. As for the culture, I love how the Safe Lands has its own words - femme for girl, glossy as 'cool' or 'in' sort of thing, mimic for fan (as in I'm a fan of Jill Williamson), etc. The television shows, medical information, clubs, and architecture all added to the creative and plausible future world.
This book does have some mature themes, so it's not for kids. However, for Jill's target audience of older teens, it's perfect. Just perfect. I can't find anything wrong with this book and recommend it to everyone 15 and older. Five stars!
I received this book for free from the author in exchange for a review. All opinions expressed are entirely my own.
And now for the giveaway! One lucky winner (US addresses only, sorry) will receive a copy of Captives from Jill's publicist.
a Rafflecopter giveaway
Check in at the other tour stops! Many of them are also running giveaways, so you can increase your chances of winning ;)
ADD Librarian • Blooming with Books • Bookworm Reading • Chris Kolmorgen • Christian Book Review Blog • Christian Bookshelf Reviews • CTF Devourer • Emily Rachelle Writes • Heavenward Reviews • Jessica Laurie • Labor Not in Vain • The Life of a Teenage Writer • The Maniacal Bookworm • Mrs. Southern Bride • Oh, Restless Bird • Pages from My Journal • The Pen and Parchment • Rachelle Rea • The Ramblings of a Young Author • Realm of Hearts •Shadow Writer World • A Simple Life, Really?! • Surrendering All of Me • Terri Harr • Verbosity Book Reviews • Who YA Reading? • Worthy2Read • The Writings of Rosie
Saturday, May 25, 2013
DIY Party Diva: Boys' Piñata Party {Food + Favors}

Boys' Piñata Party
{Food + Favors}
Theme: Piñatas and candy; Guest list: Boys, ages 6-10
The lollipop ice cream cone centerpiece counted as food, and the candy from the mini piñatas doubled as favors, as did the prize candy from the punch box. But we also had special piñata favor bags and some very special...
Piñata Cookies!

This is probably one of the most involved projects I've tried off Pinterest. It was a lot harder than I expected, too! For this project, I'm going to sort of break the DIY Party Diva 'rules' and send you over the original tutorial. It's much better for such an involved project: http://www.sheknows.com/food-and-recipes/articles/958083/cinco-de-mayo-pinata-cookies
But I'll still post my photos! :)


A lot of work was involved!


Layering the dough? Definitely not as easy as it looks.


Of course, involved kitchen project = heavily involved dish duty!


Slicing up the frozen dough...


Cutting the baked cookies. We're not done yet!


Assembling...

...and filling.


The cookies on the tray are awaiting assembly and filling. But see those overflowing cookie jars? That's all the extra from outside the cookie-cutter. (Makes for plenty of snacking while working!)

The finished product! We decided not to have a birthday cake since these things were a lot bigger (massive three-layer!) than expected.
Favor Bags

What you'll need: Paper bags, double-sided tape or glue, tissue paper, scissors, marker
What to do: Decide how many layers of tissue paper you want and measure how wide your strips will have to be, keeping in mind the layers should overlap. Cut your tissue paper into strips, then 'fringe' those strips.
Start with the lowest layer of tissue paper. Fold the strips to the width of the bag so they are two or three sheets thick. Cut off what's left of the strip (you can probably use it on another bag if it's long enough). Glue or tape into place. Repeat going up the bag, making sure to leave space at the top for the name. Allow any glue to dry.
Use a Sharpie or other marker to label the bags. All done!
I don't have any party photos for this party, and for the next two weeks DIY Party Diva will be on hiatus. Tune in on June 15 to see what our next party will be!
I don't have any party photos for this party, and for the next two weeks DIY Party Diva will be on hiatus. Tune in on June 15 to see what our next party will be!
Thursday, May 23, 2013
...And the Mountain Top
After reading Tuesday's post, you, my lovely readers, might be wondering... what's the point of chasing our dreams if we just end up discouraged, defeated, or in my case, overwhelmed?
That's where examples of others' success comes in handy. When we feel like we just can't do this, we look up to those who already did.
I'd share the stories of these people, but there's so many of them, I decided to just give you the names and a short tidbit. If you want to see the specific stories, just do an internet search or find a book about them at the library. You're sure to be inspired!
People who never quit their dreams - and reached them!
- Abraham Lincoln: Failed as a businessmen, a lawyer, and six times in politics; sixteenth President of USA.
- Winston Churchill: Failed sixth grade and several elections; became Prime Minister of England.
- Thomas Edison: Failed in school, fired twice, and failed 1,000 times in his quest for the light bulb; did eventually invent the light bulb, among other things.
- Albert Einstein: Couldn't speak until four years old, couldn't read until seven, expelled from school; became quite possibly the best-known mathematical genius in the world
- Henry Ford: Couldn't read, couldn't write, failed in business five times; invented the Model T Ford and made popular the assembly line
- R. H. Macy: Failed in business seven times; founded Macy's
- Babe Ruth: Struck out 1,330 times; held a record of 714 home runs
- Lucille Ball: Told by her drama school's head instructor to "Try any other profession"; became the title actress of the television show I Love Lucy
- The Beatles: Rejected by two recording companies; became a famous band
- Beethoven: Called hopeless by his teacher and went deaf; composed great symphonies still loved today
- Van Gogh: Sold one painting for $50 to his sister's friend - in his entire life; painted 800 works now considered masterpieces
- Dr. Suess: First book rejected 27 times; became one of America's most famous children's authors (also has his own holiday)
- Jack London: Rejected 600 - yes, six hundred! - times before first publication; famous author
And my personal favorite: Walt Disney was fired by the editor of the newspaper he worked at for - no joke - lack of imagination. "If you can dream it, you can do it." ~ Walt Disney
Still feeling down on your dreams, like I was? I found this to be a great article: http://www.devotionaldiva.com/2013/04/no-wasted-dreams/
Still feeling down on your dreams, like I was? I found this to be a great article: http://www.devotionaldiva.com/2013/04/no-wasted-dreams/
Tuesday, May 21, 2013
The Valley of Dreams...
Today, I'm just going to be real with you. No glossy photos. No smiley, happy, bouncy Emily today. Right now, my life is crazy and messy. If I want to be real with my lovely readers - and I do - then my blog has to reflect my life, messy and all.
One of my biggest dreams is to be published. As many of you know, I've been working on self-publishing my novella Sixteen. This month, my friend and editor Rachelle Rea and I are working on editing. With my focus on this book, I decided to look at everything I need to do between now and the launch date (the day my book comes out) and make a timeline for me.
I ended up going to bed very late and very discouraged.
There's so much to do - editing, formatting, figuring out legal stuff like taxes, technical things like learning the publishing features on the platforms I want to use, marketing and blog tour to-dos... I'm in way over my head here. Those writers who stick with traditional publishing, with their agents and the publishing house taking care of so much of this stuff or at least explaining it to them, look like the smart ones from where I am right now.
My publishing journey mirrors my real life right now, too. My bedroom is a mess and half of it is inaccessible as I figure out where in the world to put all my stuff in this new house. Several things with church and school - like typing puppet scripts or six AP-level tests I didn't realize I was supposed to have done - are taking so much of my time. And issues with a friend that have been simmering since last summer are coming up to the surface again and just making more waves that I really don't need.
So what do we do when our dreams and goals, the things we've longed to do and have been planning for so long, suddenly pull us under? What do we do when we feel like we're drowning with commitments? When we have more to-dos than time? When we find ourselves backing out on so many people that were counting on us, because it is physically impossible for us to follow through on everything we thought we'd have time for?
I don't know, my lovely readers. I just don't know.
I'm participating in Melanie's Monthly One Word Linkup Party. Join us!
Saturday, May 18, 2013
DIY Party Diva: Boys' Piñata Party {Activities}
Boys' Piñata Party
{Activities}
Theme: Piñatas and candy; Guest list: Boys, ages 6-10
Scavenger Hunt
I don't have any photos of this activity, but basically any scavenger hunt will work. For my brother's birthday, all his guests were his Sunday School classmates, so I wrote down names of Bible characters. The boys had to figure out what object or place would go with that character and then their next name would be hidden there. For example, a paper reading "Mary, Mother of Jesus" led to a baby doll, while "Shadrach, Meshach, and Abednego" led to the oven. (Our version of a 'fiery furnace.' A fireplace would work, too.)
I don't know how to make a free printable, or I'd share my scavenger hunt here. Sorry! So, if you'd like the Bible characters scavenger hunt, email me! I'd be glad to send it to you. :)
At the end of the scavenger hunt, instead of a prize, we had a...
Punch Box!

What you'll need: A big cardboard box, template for circles (I used an old butter lid), pencil, pocket or X-Acto knife, spray paint, colored tissue paper, packing tape, strong scissors, permanent markers, small prizes

What to do: First, cut off one side of the box - preferably the bottom - and save the flaps. On the opposite side, use the template and pencil to draw as many circles as you have party guests. Then use the knife to cut out these circles. Spray paint the entire outside of the box and let dry overnight. (Make sure to do painting and drying outside or in a very well-ventilated area.)

Now, cut squares of tissue paper - you'll want a few layers - for each hole, and tape in place inside the box.

Then, cut slits in the flaps you saved from the cut-out side and slide them together to create shelves, like in the photo below. Tape in place.

Now, write on and/or decorate the front of the box. It's ready to be filled with prizes and set up! I placed a candy bar on each shelf and set some smaller candies leftover from last week's piñatas on top.

Human Board Game
This was a specific request from the birthday boy. We played it at a board-game themed party for his older brother and it was a huge hit.

What you'll need: Plain paper, colored paper or cardstock, markers, masking tape, cardboard box (medium to small), duct tape, black permanent marker, large playing space

What to do: Write all sorts of creative activities on the colored papers - both board game related and just stuff you have to do. As you can see from the photos, "Switch Places With Any Player" and "Move Forward Three Spaces" were two board-game activities I used. Examples of just plain fun stuff I used are "Sing 'I'm a Little Teapot' With the Actions" or "Hop On One Foot For Your Next Turn." All my spaces included doodles as well - makes it more fun. ;)

To make the die, tape your cardboard box shut and then cover it with the duct tape, all six sides. (Sorry, no photo.) Then use the permanent marker (and real dice for reference if needed) to make the dots. Everyone loves the giant die!

When you're ready to set up the game, recruit some helpers and tape the fun colored squares down with two to four plain papers in between. Our 'board' started in the driveway and twisted into the parking lot. This was probably one of the kids' favorite parts of the party. It's always a hit!
Guessing Jar

What you'll need: Glass jar, decoration (I used rainbow pom-poms), hot glue gun, small candies (I used Skittles), slips of paper and writing utensils for all guests
What to do: Decorate the jar's lid - I hot glued my pom poms on. Count out your candies (the most involved part, bleh) before filling the jar. All done! Probably the easiest activity here in terms of preparation.
We used this when we were transitioning from games to food. Just set out the jar (ours doubled as decoration - score!) and let the kids pass it around, get a good look. Then everyone wrote down their guesses and turned them in to me. The closest guess takes home the whole jar!
Tune in next week for food and favors!
Thursday, May 16, 2013
Crush
Hello, my lovely readers! Apologies for my no-show on Tuesday. With moving, school, the INSPY awards, and a lot of summer plans starting to pick up, I've been swamped. But I'm back today, with a new Taylor Swift fanfiction for you to enjoy! If you'd like to go back and read it, I've also written a fanfiction piece based on Taylor Swift's "Love Story."
The pounding in your chest throbs up through your head and drowns out the drums currently playing on stage. Too soon the sophomore twin brothers are finished. You know you're next. Sucking in deep breaths, you wipe the palms of your hands on your soft purple sundress. A tiny bit of feedback echoes through the gym as the principal calls out your name on the microphone. Clutching the neck of your guitar for dear life, you scuffle across the stage.
It takes a moment to see anything through the glaring spotlights. You blink rapidly, straining to see your best friend in the third row. She's grinning and nodding, giving a thumbs up. Then, more discreetly, she points to her left. You glance over at the row across from her and scan the faces.
There he is.
Closing your eyes and taking in one last calming breath, you arrange your left fingers on the strings and start to strum with your right hand.
"I don't think that passenger seat has ever looked this good to me..."
The song starts out like a generic love song. Nobody can tell anything yet. As you sing out into the crowd your pulse doubles yet again. You're certain you're shaking, and it's a war just to keep your fingers and voice under control. Just get through the song and you can leave. It'll be over soon.
"He'll never fall in love, he swears, as he runs his fingers through his hair. I'm laughing 'cause I hope he's wrong."
What were you thinking?
You avoid looking at anyone you know and throw your focus into the music. The chorus starts. There's no turning back now.
"And I could tell you his favorite color's green, he loves to argue..."
How many other boys do you know with one sister and a birthday on the seventeenth? Oh my gosh, everyone will know. That's what you wanted. But what if-no, just finish the song.
"He stands there, then walks away."
The song's almost over. The most personal part... you can't let this moment go. You've been practicing and praying for months. You'll regret it if you don't... so you look directly at him.
"He'd never tell you, but he can play guitar. I think he can see through everything but my heart."
You can't read his face, but he fidgets a little and pretends not to notice your gaze. Still, you can't look away. This is what you've been planning. This is the moment you bare your heart to him. He has to have at least suspected it all along.
"First thought when I wake up is my gosh, he's beautiful, so I put on my makeup and pray for a miracle!"
The song comes to an end. The gym explodes with clapping and you can hear your best friend screeching and whooping. But it doesn't matter. Your eyes are locked on his. Your hands shake. Your pulse beats against your skin. Your only thought is "Please. Please. Please."
And he finally smiles.
Saturday, May 11, 2013
DIY Party Diva: Boys' Piñata Party {Decor}

Boys' Piñata Party
{Decor}
Theme: Piñatas and candy; Guest list: Boys, ages 6-10
Invitations

What you'll need: Love vs. Design's printable invitation, computer with a word processing program, printer, printer paper, cardstock or construction paper in your party colors, scrapbooking or edging scissors, regular scissors, ruler (optional), double-sided tape or glue

What to do: Print and, with regular scissors, cut out the front portion of the invitations. Measure the cardstock against the invitations and cut with regular scissors (I just eyeballed the border, didn't measure it with a ruler, but you can if you want). Type any party instructions and details not included in the invitation basics in a word processing program (like Word or Notepad) and print. Cut these out with scrapbooking or edging scissors. Glue or tape the invitation on one side of the cardstock and the detail paper on the other side. Voila! Adorable, personal invitations.
Ice Cream Cone

What you'll need: Large bag of dum-dums or other small lollipops, styrofoam ball, tan or yellow construction paper, ruler, pencil, regular scissors, wire cutters or other strong scissors, tape, base container (I reused an old frosting jar)

What to do: First, cut off most - but not all! - of the stick from each lollipop. Then push the lollipops into the styrofoam ball, working your way around until a little more than the top half of the ball is covered.


Now, set aside the lollipop ball and work on making the ice cream cone. Measure your construction paper around the sides of your base container and cut, leaving enough overlap to tape the sides together. Use the ruler and pencil to create the lines found on a regular store bought ice cream cone. Align this piece on the base container and tape in place. To make the top of the cone, the part that sticks out and actually holds the ice cream, set the styrofoam ball in the base container and measure the construction paper around it, so it overlaps the base paper a little and is flush against the lowest layer of lollipops. (Sorry if this is confusing. I had a bit of trouble with this step and didn't take any photos.) Cut, make the ice cream cone lines, and tape in place.
This should be your end result - a great candy centerpiece:

Mini Piñatas
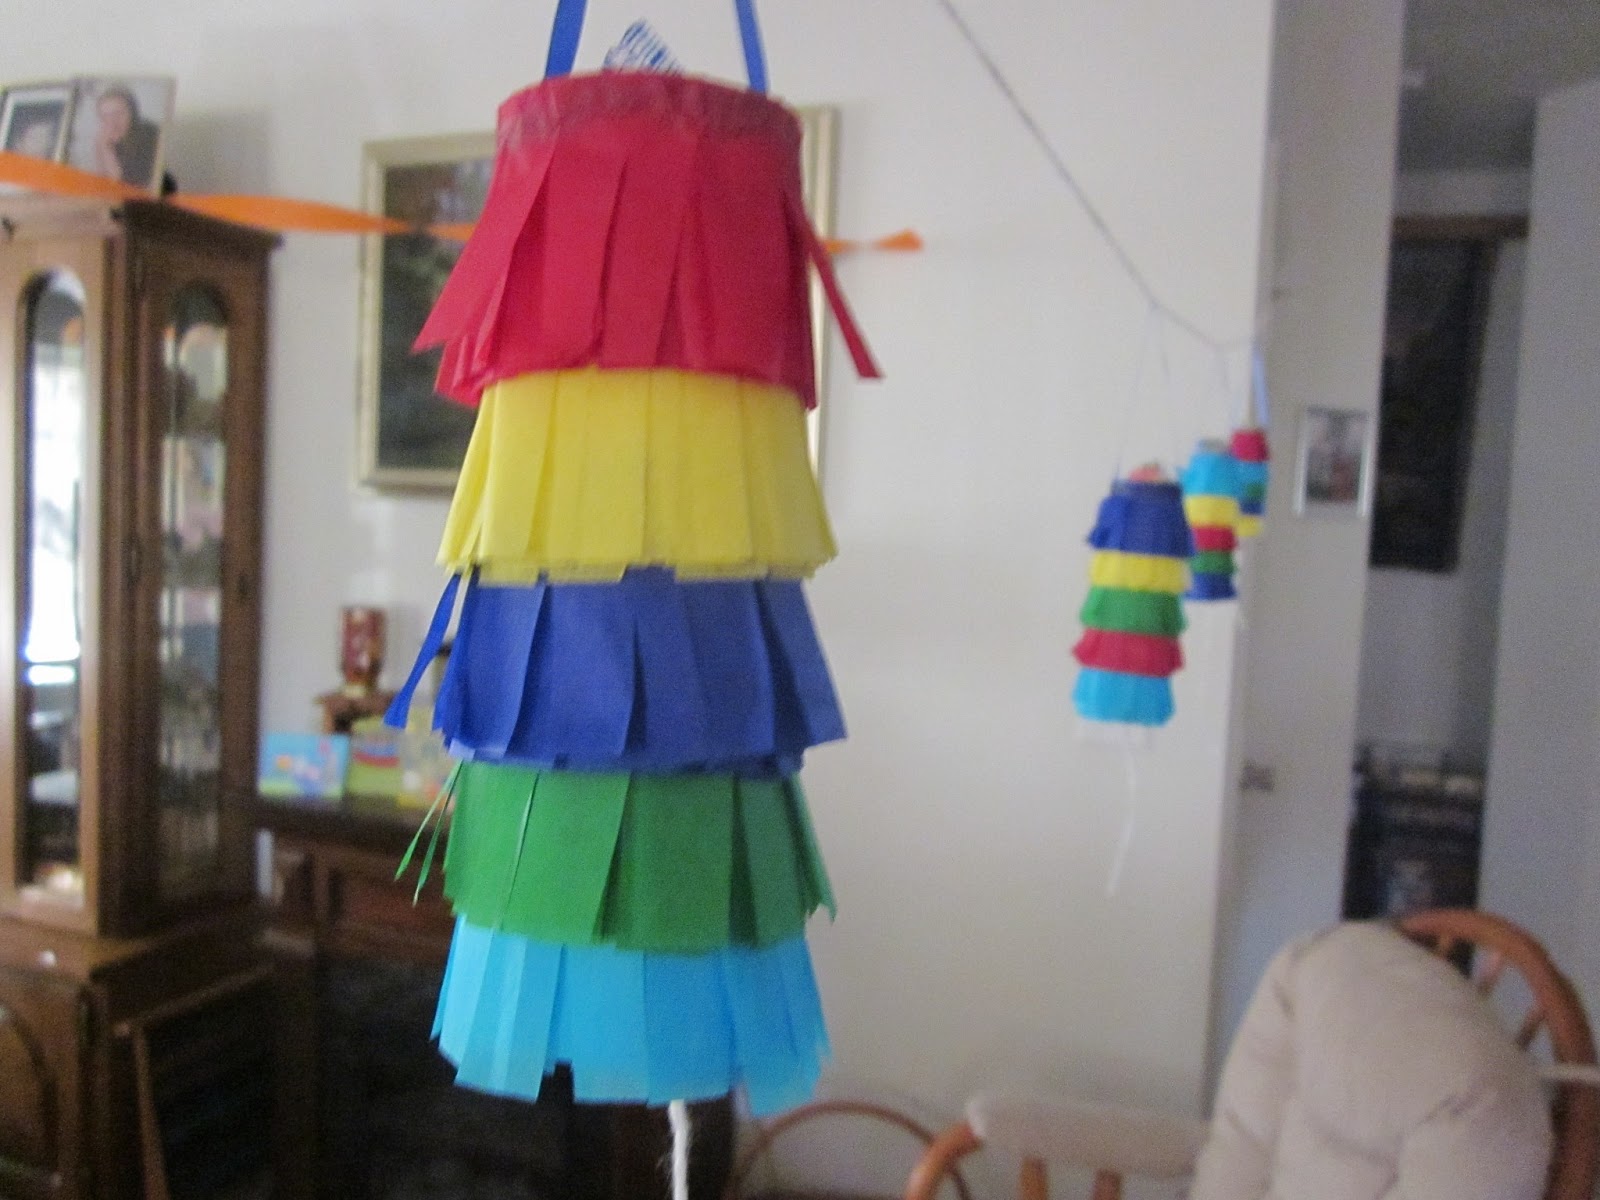
What you'll need: Colored tissue paper sheets (full size), toilet paper tubes, scissors, tape, double-sided tape, glue, ruler, string, ribbon, candy for filling

What to do: First, cut small squares of tissue paper to cover the bottom of the piñata. Tape the square over the bottom of the toilet paper tube, then make a small hole in the middle of the square. Run a piece of string through the hole and tape it to the square. This will be the release for the piñata.
The tissue paper fringe is actually long strips glued around the toilet paper. Figure out how many layers/colors you want on each piñata, and then use that to figure out how wide your strips should be. Remember that the strips need to overlap each other. Start with the bottom color, so for a piñata like the one above, start with light blue. Cut the tissue paper lengthwise into strips. Cut fringe on one strip, then use the double sided tape to secure it along the bottom edge of the toilet paper tube. Using small amounts of glue, continue wrapping the strip until the entire strip is wrapped. Allow to dry while you complete this step on the other piñatas, as many as you want.
Repeat the fringe steps for each layer until the toilet paper tube is covered. Then, cut a piece of ribbon for each piñata, and tape to the inside. Fill the piñatas. You can hang the piñatas however you like. I made a garland for mine - just line them along a piece of string and secure that string well (it will be heavy).
Streamers!


Tune in next week for party activities!
Subscribe to:
Comments (Atom)